|
| Vincent, Age 13 |
I printed off and taped up a copy of the photo on my studio wall, and little Vincent watched over me as I operated my own deadline driven art factory. I kept on looking up at and really thinking about the young man with the intense blue eyes and careful, enigmatic gaze. I observed his very prim and buttoned up suit and tie, which had obviously been quite carefully arranged in anticipation of the photographer's exposure, and I noticed especially how hidden he looked, despite the fact that the photograph was a complete reveal.
Of course I had seen the photo many times; I first ran across it quite early in my research for The Vincent Project. Initially, I was struck - simply by what a beautiful little boy he was. He seemed so different from the bearded, strange man of his adult self portraits, but you could still see - around the eyes, with their steady, even gaze - that he was indeed the Vincent he would grow up to be.
Although his life had already been difficult, with a strict mother who criticized his every action, the Vincent in the picture was still an innocent. He had not been afflicted by failure and illness, nor had he experienced the rejection and banishments which were to come.
 |
| my Vincent, Age 13 |
As I played with the pots of multi hued inks that were scattered all over my desk, I decided that I wanted to make my own portrait of Vincent, age 13. I wanted to see if I could capture not only who he was, but who he was to become. I wanted to spend at least a day thinking about the boy Vincent, rather than the man Van Gogh.
I did not trace.
I drew a free hand Vincent on some pastel paper, emphasizing his large and intelligent eyes. I paid careful attention to the stiffly held mouth, which had undoubtedly been told to "hush" as he sat down in the photographer's chair.
At first, I did what was essentially just a line drawing, outlining the facial features, hair, and handsome polka dot tie. I could have stopped there, and it would have been a fine and recognizable drawing. But something made me press on. The more I added to the portrait, the more I was thinking about Vincent, and what drove him to become an artist. How was he transfigured from this insecure, yet supremely intelligent boy into the man who captured the sky, the sunflowers, the fields, the iris, and, most importantly, himself?
 |
| Picasso with his sister |
After finishing Vincent's portrait, I decided to research photographs of other artists as children. The first one I looked up was Pablo Picasso. The great Spaniard was a beloved child of a father who was both a painting academy teacher and a fine artist in his own right. Picasso's father nurtured his talented son, eventually giving the child his own paintbrushes when he realized that his son's talents were far greater than his own.
From the date of his birth, Picasso had been told that he was not only an artist, but a great one.
You can see in the portrait of Pablo and his sister, at right, that young Picasso's affect is (how to put this?), markedly different than that of young Van Gogh.
Little Pablo is absolutely chilled out, and completely dominates this image. His sister adopts Vincent's posture - erect, polished and without a hair out of place. Pablo is thumbing not only his nose, but his whole body at the photographer and any later viewer of the image.
Pablo's clothes are (seemingly purposefully, as if by his own hand) askew, his hair is a tousled mess, and he sits in a wide open, completely relaxed posture. I doubt that many adults, even professional models, could achieve his attitude of nonchalance.
Pablo is looking directly, defiantly at the photographer, while Vincent's gaze is distantly focused.
Pablo's is the portrait of a baby lion. Vincent's is the portrait of an entrapped mouse.
How did each of these very different boys grow up to become the most influential artists of their generation?
I tried very hard to do a portrait of Picasso from the picture with his sister, but ultimately I failed because the quality of that old picture was just so low, and I could not see enough detail in the image to capture a good likeness. So I looked around for another picture.

There were many portraits of this imposing, confident boy, but I settled on one (at right) that was taken when he was around age 15. In some ways, the picture does not look like him because his hair is closely shorn, and he has the serious, manly look that only a 15 year old boy can muster.
You may note that his clothes, like the clothes in the earlier portrait, are rumpled and sloppy; they look like he either slept in them, or at the very least, directed his maid to pick them up from a stepped on heap on the floor. I do not get the idea, from this view, that a Mother was allowed to fuss or groom him before the shutter was snapped - I think that any such feminine hand would have been irritatedly swatted away.
 |
| The finished portrait of Picasso |
For the portraits of both of these young artists, I decided to work on pastel paper, which can take a bit of wet application. I did tape down my supports to lessen buckling, and I worked with my reed pen and colored, black and white inks.
At left, you can see my final portrait of Pablo. I simplified his shirt, which was quite fussy and too out of focus for me to reproduce.

I inked Pablo in blue for his blue period. Pablo is #43.
At right and below are two photos of a drawing that I started, but ultimately abandoned when I found the shirt too difficult to render.
I fussed and fussed with the shirt (which I think was actually a frilly, lacy, ascot type of garment) until I completely destroyed the drawing.

I was sad that I messed it up, because it was actually the better drawing than the one that you see above.
Honestly, I think I was so tired after doing all of those ink drawings en masse (see previous blog) that I just ran out of patience to try to fix this drawing.
Regrets? I've had a few.
So that was Pablo. But what about other artists in their youth?
When I did the painting for the billboard competition, I included self portraits done by Vincent, Pablo, Rembrandt, Frieda Kahlo and Matisse. I knew that there was very little likelihood that I would find an early photograph of Rembrandt, so I started with Frieda Kahlo.

I knew that Frieda had a "look," and I wanted to see if she looked like Frieda Kahlo when she was just little Frieda.
 |
| The finished portrait of Frieda |
She did.
You can see for yourself the strong, independent little girl looking with directness at the camera.
Her large and floppy hairbow is almost an exact match to one worn in a similar portrait of my mother. I am also touched by the necklace, which presages the jewelry which Frieda made iconic.
I inked Frieda in purple because the color reminds me of Mexico. Frieda is #44.
I looked and looked for photographs of other young women artists, but found only one other (the great portraitist Alice Neel). Post photography era male artists were much better represented, a fact which I found very curious. (For that matter, there were many, many more established male artists than there were women artists.) What gives with that? Why did nobody take pictures of these little girls, or were the pictures taken and then destroyed? Why are there so few of them, and why is their record so sketchy? This is something that will require much more investigation and thinking about.
So, I decided instead to find some other uber iconic artist to portray.

And who is more iconic than the original fine art pee-er himself, Andy Warhol?
So, back to Google Images for a quick look for young Andy. Naturally, there was a wealth of well styled photos to choose from. The early Mr. Warhol seemed to fancy himself a bit of a James Dean, and, with his narrowed eyes and swoop of blonde bangs, I think he actually was quite a handsome teenager. Looking through the black and white and ink tinted photos, I settled on the least self aware image I could find, a portrait of the very young Andy Warhola.
I set to work immediately, choosing a tomato soup colored paper, and a pot full of money green ink for the future very successful commercial artist. For good measure, I tried to make my portrait distinctively "Andy" by repeating his image in it. Painting two Andys simultaneously was such a good exercise to do - the two portraits are no where near exactly alike, and it was quite fun to see how different they were, even as I was painting them side by side.

I found the photo to be completely adorable, and I just loved the way that Andy's collar curled up on the right side. He looks neat and conventional, just like a favorite son, but there is enough cheekiness and edge in the image to know that young Andy was up to something big.
I painted Andy's face and shirt with extra whiteness (as compared with the other artists) because I thought he would appreciate that exaggeration. This portrait (Andy is painting #45) was brought directly to you from my own version of the Factory.
______________________________________
OK. That's enough child's play. It is time that Vincent and I began our last, most serious discussion.
Throughout the Vincent Project, I had always intended to reproduce several of Vincent's iconic self portraits. Although I had dabbled a bit into this oeuvre...
 |
| For an illustrated envelope; this was instantly mailed away. |
 |
| "The Conversation" Rembrandt, Van Gogh, me, Kahlo, Picasso, Matisse, Mondrian Not a complete portrait in the bunch. |
...the truth was, that I was scared to paint Vincent's most iconic work. After all, I wasn't really an artist. I couldn't possibly even try one of his portraits before I felt like I was "ready." You know what I mean by "ready." Worthy. Capable. Good Enough. A REAL Painter.
But it was week #51, and the time had come. I couldn't hide from him, or from myself anymore.
I googled "Van Gogh self portraits, and came up with six that I wanted to do. I will present my versions on the left; the originals are on the right. (And I did my best to line these up, I just could not figure out how to do it. Much thanks to the wikipedia article on Van Gogh self portraits, and much irritation with Blogger!)
 |
| #46 |

 |
| #47 |

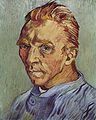

 |
| #49 |

 |
| #50 |

 |
| #51 |

What was it like to paint Vincent 6 ways?
On one level, it was really just about the mechanics of each portrait. I tried to pick both the more iconic portraits, as well as portraits that showed differing styles or periods. The more I painted, the less scared I became. I took things a dip and a stroke at a time.
I can tell you from having now repainted all of Vincent's work, that each original portrait was rendered in a very distinct fashion. His eyes are a different color in every one of them, with some eyes being different colors within the single picture. His nose, mouth, hair and beard were all similar, yet very different from portrait to portrait. In looking closely at each image, you could tell how he thought about himself at the particular time that each was painted.
In each of the six images, I saw the little 13 year old boy. In each of the six images I saw a lot of pain.
I will confess that I painted frequently during that week with tears rolling down my cheeks. I felt both so close and so far from this painter who has moved me so much with his art. Painting Vincent's portrait 6 times and in 6 different ways felt both very intimate and not intimate at all; it was like having 6 kind of drunken bar conversations with a stranger who, for at least an evening, had become a friend, but by the next morning you can barely remember a thing they said. I feel like I know Vincent, but really, I don't know him at all.
My next blog, featuring painting #52, will be a summation of my experience with Vincent - how this project has changed my life, and what this has meant to me.
But for now, thanks for reading along and sharing this journey with me. I will be posting within the week about my profound, tear filled, very public final experience with my favorite Dutchman, and how Vincent taught me to tell him good bye.
Have a beautiful, art filled day!
Catherine